
Code coverage is an useful metric tests definition. But it's not the single one metric which can be used. One alternative are mutation tests.
The post is divided in 2 parts. The first one defines mutation tests. The second shows how to implement them in Java.
Definition
Mutation tests are a technique responding to the philosophical problem of "Who will guard the guards ?". In testing world it's translated by "Who will check if the tests test correct stuff ?". In other words, mutation test check if written tests will fail when tested code will mutate. The mutation can be represented as for example the change of boundary value such as MIN_LENGTH in below code:
public boolean isCorrectName(String name) {
  return name != null && name.length() > MIN_LENGTH;
}
After changing MIN_LENGTH mutation test is expected to fail. If it does, it's considered as correct. Otherwise, it indicates that it's incorrectly defined and for example it tests bad piece of code.
We distinguish 3 types of mutation tests:
- value mutations - changes the value to much larger or much smaller than defined. It's often applied to constants.
- decision mutations - applies to conditions, typically if-else statements. It can for example change an AND clause to OR.
- statement mutations - in this situation the statements can be either deleted or duplicated. The example of statement mutations can be the duplication of incrementation in below code:
if (isNewItem) {
  i++;
}
Mutation test lifecycle
Mutation test follows a strict lifecycle where the word mutant appears plenty of times. This word represents the code containing mutation, i.e. modified with the goal to fail the test. As you can imagine, the first step of mutation test is the creation of mutant.
Once all mutants are introduced to code, the original tests are executed against mutated code. If the test fails, the mutant is killed. It means that mutation test passes. In the other side, when the original test doesn't fail, the mutant is alive.
Killing the mutant is a synonym of 3 conditions to met, commonly called RIP model:
- Mutation statement must be reached by the original test.
- Test input must produce different behavior on mutated and not mutated tested code.
- Incorrect state must be checked by the test.
The result of mutation tests is represented as mutation score, calculated from given formula:
MutationScore = KilledMutants / AllMutants
Mutation test example
We'll see an example of mutation test thanks to PitTest framework and its IntelliJ plugin. A pretty simple example will be used:
public class MutationTest {

  private DecisionMaker decisionMaker = new DecisionMaker();

  @Test
  public void should_detect_4_letters_name_as_valid() {
    assertThat(decisionMaker.isNameValid("test")).isTrue();
  }

  @Test
  public void should_detect_user_as_minor() {
    assertThat(decisionMaker.isMajor(10)).isFalse();
  }

}

public class DecisionMaker {

  private static final int MIN_LENGTH = 3;

  private static final int MAJOR_AGE = 18;

  public boolean isNameValid(String name) {
    return name != null && name.length() > MIN_LENGTH;
  }

  public boolean isMajor(int age) {
    return age >= MAJOR_AGE;
  }
}
The configuration used to ran this code through the Pit plugin is --outputFormats HTML --verbose true --exportLineCoverage true --targetTests com.waitingforcode.tdd.mutation.* . After executing the the first time, you'll see that 2 test cases are missing for boundary conditions. The first is the check on 3-letters name. The second corresponds to the age greater or equal to 18:
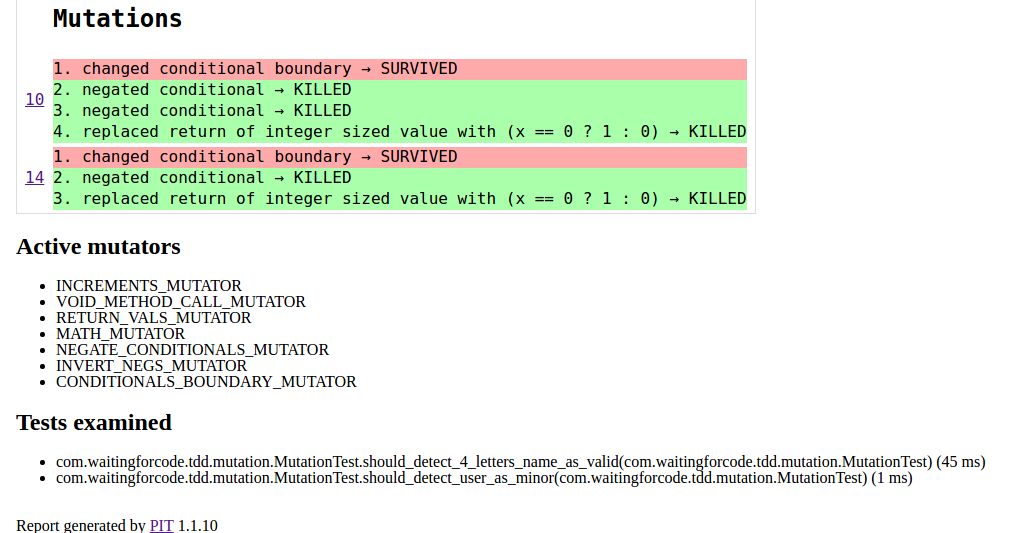
Thus, we add 2 tests to cover these conditions:
@Test
public void should_detect_3_letters_as_invalid() {
  assertThat(decisionMaker.isNameValid("tes")).isFalse();
}

@Test
public void should_detect_user_as_major() {
  assertThat(decisionMaker.isMajor(18)).isTrue();
}
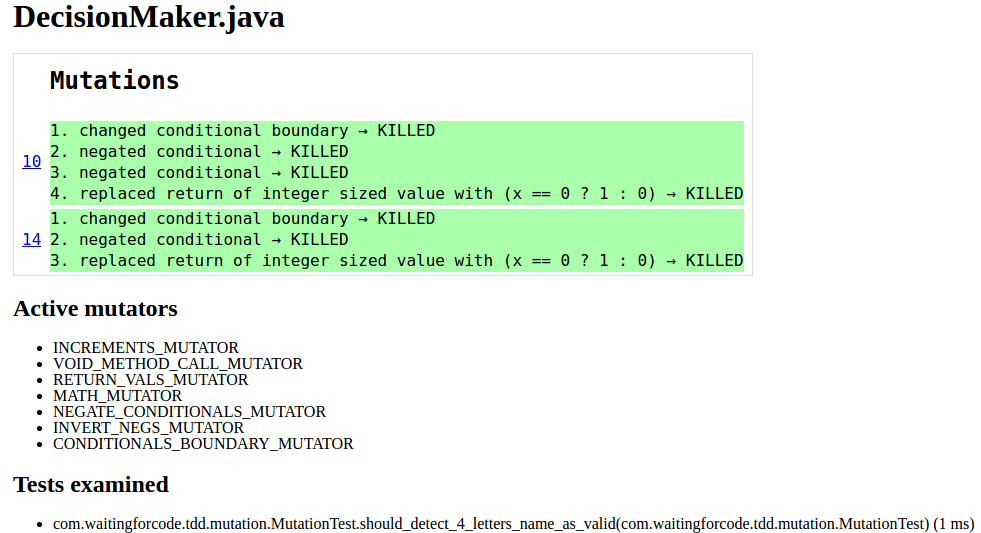
Now, after re-executing Pit, we'll see that all test cases are covered (= all mutants are killed):
Through this post we can see how much mutation tests can help in the definition of well covered tests. The first part presents the idea of mutation generally. We can learn that mutations tests are a kind of "test guards" detecting if written tests are correct and exhaustive.
