
Containers are with us, data engineers, for several years. The concept was already introduced on YARN but the technology that really made them popular was Docker. In this post I will focus on its recommended practices to make our Apache Spark images better.
What would it take for you to trust your Databricks pipelines in production?
A 3-day bug hunt on a 3-person team costs up to €7,200 in lost engineering time. This workshop teaches you to prevent that — unit tests, data tests, and integration tests for PySpark and Databricks Lakeflow, including Spark Declarative Pipelines.

Konieczny
The post idea born on Twitter where AmRajdip asked me if I've already wrote about Docker and Spark best practices. I didn't but the topic was so interesting that despite that, I gave a try. Thank you @AmRajdip for the idea!
I will start this article by describing some of Docker images best practices that you can find in a lot of places (meetups, confs, blog posts, ...). I put all the references below this article. By doing so, I wanted to gather them in a single place and try to find the counter-examples. From time to time I succeeded to, so you should also get some negative feedback about few of them. After that introduction, I will analyze the official Spark image and try to create a custom image to run on Kubernetes.
Docker images best practices
I gathered here all best practices that I will try to put in practice in the next section:
- ephemeral containers - one of the important concepts is the stateless character of Docker containers. They should be able to restart at any time with minimal setup and configuration. It doesn't mean that you cannot use the local cache. If you need to download a file, you can still do it but very likely, you'll need to do the same thing if your container restarts.
- external persistency (VOLUME) - the previous point brings another, where persist the data since using container's space is not recommended? Docker has the concept of volumes, defined on the image with VOLUME instruction. It creates a mount point on some external place, so in other words, maps external storage to the local Docker storage. Of course, depending on where your volume is located (network, host), you'll get more or less latency on writing and reading files. I'm writing this because you can use a Docker concept called volume driver which supports writing files to some cloud storage or NFS. Also, storing data on volumes helps to reduce the size of the images which is another recommended practice.
- keep images small - it's like with Maven external dependencies, there is a difference between downloading 10MB and 100MB dependency. The smaller image will improve download time but also cold start and disk usage. To build small images you can start by using the smallest base images possible, like Alpine. However, I found that there can be some issues with them. You can find some details in Problem #4 part of A review of the official Dockerfile best practices: good, bad, and insecure.
- cache layers to accelerate build time - when you create a Docker image, every RUN, COPY and ADD commands create a new layer. So whenever you change something happening before them, they have to be recomputed. Recomputation can sometimes take time and that's why it's recommended to first, reduce the number of layers, and second put less frequently changing layers at the top of the image. That way they won't recompute every time you change something more variable, like configuration file. In Bitnami's Best practices writing a Dockerfile article you can see how this simple trick helps to decrease build time from 114.8 to 5.8 seconds!
- kind of similar recommendation to the previous one concerns package cache from apt-get - the first point about this is to avoid to launch upgrade and dist-upgradecontainer. Docker documentation recommends to contact the maintainers of the parent image for dependencies upgrade or launching an upgrade only for the dependency you're targeting.
A more important thing is to always combine apt-get update and apt-get install in a single command (apt-get update && apt-get install). The reason for that is also related to the layers. If you update the cache in the first layer and later install the dependencies from another layer, your dependencies can be out of date simply because Docker, at the build time, won't rebuild the cache update layer
- prefer COPY over ADD - sometimes you may want to add some resources from your host. Docker recommends using COPY instruction for that. Both globally do the same, ie. they can be used to add extra files to the image. But there is a small difference. ADD can extract tar archives automatically and also download resources from a remote host. Because of that, the best use case of ADD is to extract tar files and for the other things it's recommended to use COPY or RUN with wget/curl:
# examples from https://docs.docker.com/develop/develop-images/dockerfile_best-practices/ ADD rootfs.tar.xz /. RUN mkdir -p /usr/src/things \ && curl -SL http://example.com/big.tar.xz \ | tar -xJC /usr/src/things \ && make -C /usr/src/things all - use ENV - ENV instruction is helpful if you want to modify environment variable of your container and, for instance, add the bin directory of an executable to the path and be able to run the executable without specifying the full address.
ENV can be also used as a kind of variable in the image. Let's imagine that you're working with software having a specific version and you must duplicate this version in 5 places. By setting it inside an ENV, you can easily avoid the duplication. Another advantage of that use case (FYI, you can also use ARGS for that where ENV targets more the running containers and ARGS build images) is that you can dynamically recompute all required layers by simply changing one property. I found a great example of that in runnable's article 9 Common Dockerfile Mistakes. The variables from the top define what version is executed whereas the ones from the bottom are rather "descriptive" metadata. Now if you change the version, your image will automatically recompute below layers (layers using the "configuration" ENV are defined after it, so become invalid when ENV is changed!)# example found in https://runnable.com/blog/9-common-dockerfile-mistakes ENV GOLANG_VERSION 1.7beta1 ENV GOLANG_DOWNLOAD_URL https://golang.org/dl/go$GOLANG_VERSION.linux-amd64.tar.gz ENV GOLANG_DOWNLOAD_SHA256 a55e718935e2be1d5b920ed262fd06885d2d7fc4eab7722aa02c205d80532e3b RUN curl -fsSL "$GOLANG_DOWNLOAD_URL" -o golang.tar.gz \ && echo "$GOLANG_DOWNLOAD_SHA256 golang.tar.gz" | sha256sum -c - \ && tar -C /usr/local -xzf golang.tar.gz \ && rm golang.tar.gz ENV GOPATH /go ENV PATH $GOPATH/bin:/usr/local/go/bin:$PATH
Finally, ENV can be also a good way to configure your container dynamically and, for instance, use different data stores on dev and production by overriding the defaults at runtime.
A good practice with ENVsis to put these ENVs at the end of the file since they run pretty fast and changing them shouldn't be a big deal. Otherwise, they would involve the recomputation of other layers, so slow down the image build. - safely store credentials - my first thought was that storing credentials in ENV variables was a good practice. However, this technique has some major drawbacks like possible data leak (see Managing Secrets of Top 20 Docker Security Tips). A better alternative is to manage secrets with Kubernetes secrets.
- avoid ROOT access - it's another security best practice. It not only prevents you against malicious code execution but also seems to be required on some of Kubernetes distributions such as OpenShift that disables containers running with root user. To change the user, you can use the instruction called...USER :)
- run containers with a single responsibility - it's recommended that an image does one and a single one thing, a little bit like "S" in SOLID principle. It helps to maintain them much easier and also scale independently. An example you'll find very often is one of a PHP application and MySQL server. With separated images, you can add as many read replicas as you want.
- avoid the latest tag - it's not recommended to deploy production workloads with the latest tag of the image. It makes much harder to track which specific version is deployed and also exposes the container to unpredictable bugs. Why so? Simply because "latest" is the default tag that applies to any pushed image.
- use tag - as you understand, the tag is like a version of your Spark application. It will contain all evolutions from the last deployment. So use tags to control the changes and running versions.
- use .dockerignore - it acts like .gitignore for Git, so it's very helpful to exclude inappropriate files that could be copied by mistake to the container with ADD or COPY instructions
- be aware of the working directory - by default, the container works at the "/" but you can change the working path very easily with WORKDIR instruction.
Official image analysis
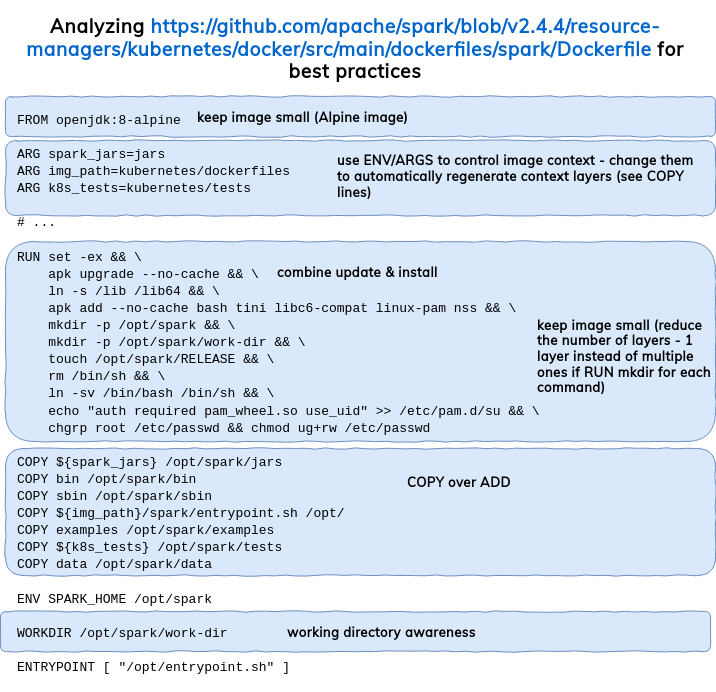
In order to not reinvent the wheel, I will start here by analyzing the Docker image provided with Apache Spark. Its version for 2.4.4 respects pretty much of the above best practices:
Custom image lifecycle
Initially I wanted to create a custom Docker image. And I tried to imagine an application requiring all of the best practices listed in the first section. Unfortunately, it didn't happen. By forcing myself for doing that, I invented a lot of anti-patterns and to avoid any confusion, I decided to analyze the official image and show how to manage it with really smart customizations in this section.
To start working with Apache Spark Docker image, you have to build it from the image from the official Spark Github repository with docker-image-tool.sh script. Normally all official images are stored on Docker Hub and you can extend them directly, without downloading and building from scratch. I didn't find the Spark image though and that's why this quite cumbersome process. Why "cumbersome"? First, your have to build Spark JARs with /build/mvn -Pkubernetes -DskipTests clean package and it can fail. It failed on my Ubuntu because of "file too long exception". After, you can still get the JARs and configure the image to use them but it's also much slower than simply putting that to your Dockerfile:
FROM official_spark_image:spark_version_I_want_to_extend
Anyway, to build the image locally, you have to:
cd ~/workspace/spark-2.4.4
# The build below is required to avoid this error:
# COPY failed: stat
# /var/lib/docker/tmp/docker-builder182148378/assembly/target/scala-2.12/jars: no such
# file or directory
./build/mvn -Pkubernetes -DskipTests clean package
./bin/docker-image-tool.sh -m -t v2.4.4 build
With these instructions, I built an image called "spark" tagged with "v.2.4.4" (see - best practices about using tags and avoid latest!). Let's run docker images to check if the images were correctly built:
bartosz:/tmp/spark$ docker images
REPOSITORY                                  TAG                 IMAGE ID            CREATED             SIZE
spark-r                                     v2.4.4              505c16a44002        2 days ago          720MB
spark-py                                    v2.4.4              9127a215f778        2 days ago          428MB
spark                                       v2.4.4              a221ab704368        2 days ago          337MB
As you can see, yes. It's now time to build the image for our custom application. It's very simplistic:
FROM spark:v2.4.4

COPY settings /opt/spark/app/

ENV EXECUTION_ENVIRONMENT 'local'
ENV ENABLED_TIME_REPORT 'no'
And to build and tag it, use the following commands:
bartosz:~/workspace/dockerized-spark/docker$ docker build -f ./Dockerfile . -t 'waitingforcode_spark:v0.1_spark2.4.4'
Sending build context to Docker daemon  4.096kB
Step 1/4 : FROM spark:v2.4.4
 ---> a221ab704368
Step 2/4 : COPY settings /opt/spark/app/
 ---> d9cb5174d876
Step 3/4 : ENV EXECUTION_ENVIRONMENT 'local'
 ---> Running in 38525d8811a2
Removing intermediate container 38525d8811a2
 ---> 2950f09eecd9
Step 4/4 : ENV ENABLED_TIME_REPORT 'no'
 ---> Running in 9271fb1b369e
Removing intermediate container 9271fb1b369e
 ---> d7a67b415fef
Successfully built d7a67b415fef
Successfully tagged waitingforcode_spark:v0.1_spark2.4.4
Let's change now the EXECUTION_ENVIRONMENT to an empty string ('') and rebuild the image with a new tag version:
bartosz:~/workspace/dockerized-spark/docker$ docker build -f ./Dockerfile . -t 'waitingforcode_spark:v0.2_spark2.4.4'
Sending build context to Docker daemon  4.096kB
Step 1/4 : FROM spark:v2.4.4
 ---> a221ab704368
Step 2/4 : COPY settings /opt/spark/app/
 ---> Using cache
 ---> d9cb5174d876
Step 3/4 : ENV EXECUTION_ENVIRONMENT ''
 ---> Running in 631698607d49
Removing intermediate container 631698607d49
 ---> c6a006134cb2
Step 4/4 : ENV ENABLED_TIME_REPORT 'no'
 ---> Running in 31d9943ec419
Removing intermediate container 31d9943ec419
 ---> dbd42ad9b5fb
Successfully built dbd42ad9b5fb
Successfully tagged waitingforcode_spark:v0.2_spark2.4.4
As you can see, the layer prior to the change were kept unchanged whereas the ones after it, were modified. Before terminating, let's launch our custom container on Kuberentes. I'm using here microk8s project (check how to Setting up Apache Spark on Kubernetes with microk8s):
./bin/spark-submit --master k8s://127.0.0.1:16443 --deploy-mode cluster --name spark-pi --class org.apache.spark.examples.SparkPi --conf spark.executor.instances=2 --conf spark.kubernetes.container.image=waitingforcode_spark:v0.2_spark2.4.4 --conf spark.kubernetes.authenticate.submission.caCertFile=/var/snap/microk8s/current/certs/ca.crt --conf spark.kubernetes.authenticate.submission.oauthToken=${MY_TOKEN} --conf spark.app.name=spark-pi --conf spark.kubernetes.authenticate.driver.serviceAccountName=spark local:///opt/spark/examples/target/original-spark-examples_2.11-2.4.4.jar
How to find ${MY_TOKEN} value?
To retrieve your token, get first the default-token by looking for a name starting with default-token-:
bartosz:/data/spark-2.4.4$ microk8s.kubectl -n kube-system get secret
NAME                                             TYPE                                  DATA   AGE
attachdetach-controller-token-2462t              kubernetes.io/service-account-token   3      2d3h
certificate-controller-token-d2msj               kubernetes.io/service-account-token   3      2d3h
clusterrole-aggregation-controller-token-kgkh5   kubernetes.io/service-account-token   3      2d3h
coredns-token-5xwj5                              kubernetes.io/service-account-token   3      52m
cronjob-controller-token-v9lj5                   kubernetes.io/service-account-token   3      2d3h
daemon-set-controller-token-mswf4                kubernetes.io/service-account-token   3      2d3h

default-token-cndqq                              kubernetes.io/service-account-token   3      2d3h
After that, issue microk8s.kubectl -n kube-system describe secret default-token-cndqq:
bartosz:/data/spark-2.4.4$ microk8s.kubectl -n kube-system describe secret default-token-cndqq Name: default-token-cndqq Namespace: kube-system Labels:Annotations: kubernetes.io/service-account.name: default kubernetes.io/service-account.uid: 099279d3-1e07-4656-a525-638bae57f5b6 Type: kubernetes.io/service-account-token Data ==== ca.crt: 1103 bytes namespace: 11 bytes token: MY_TOKEN
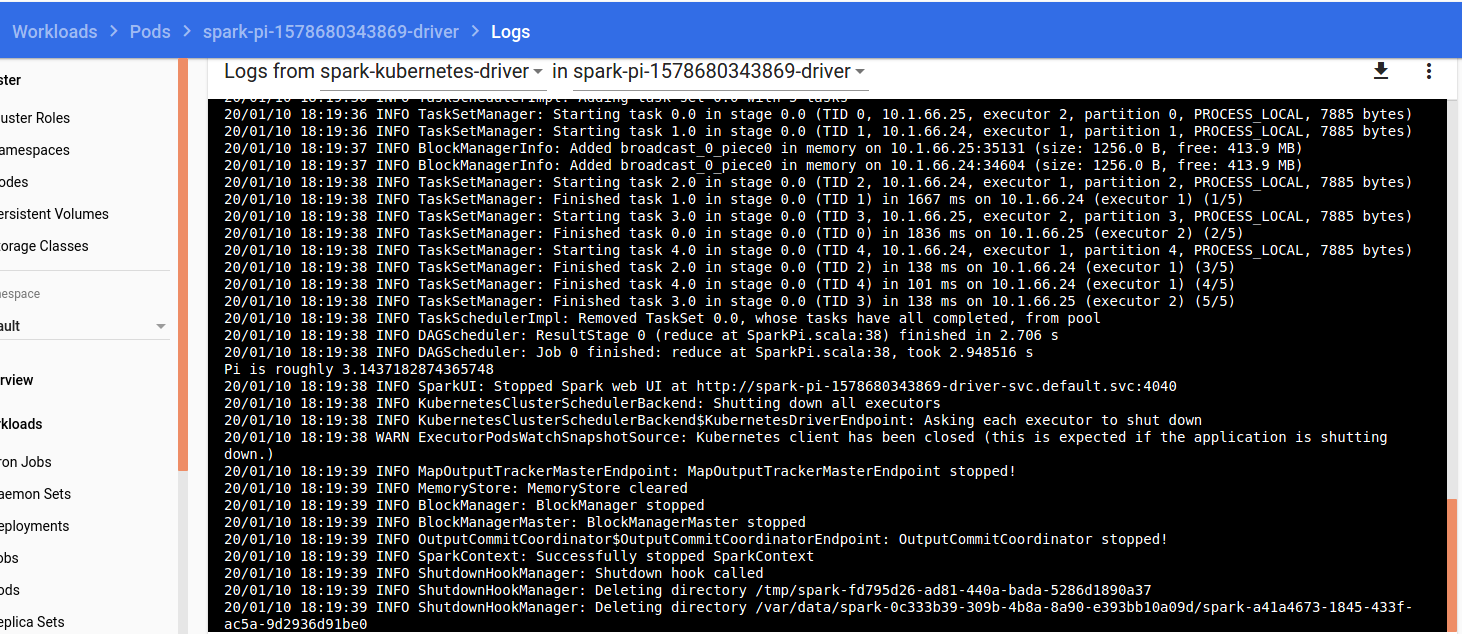
The code should compute Pi number, like in the following screenshot took from microk8s dashboard:
To be honest, writing this article took a pretty long time. I'm still not comfortable with devops concepts and had to challenge a lot all my findings by searching counter-examples. If you have an opinion on the best practices from the first section, please share them on the comment. I'm a YARN user who tries by all ways to jump to Kubernetes scheduler, for that time still locally. However, I hope that the points listed in the article can give you some value and initial guidance for the more advanced use than a simple local cluster execution.
Data Engineering Design Patterns

Looking for a book that defines and solves most common data engineering problems? I wrote
one on that topic! You can read it online
on the O'Reilly platform,
or get a print copy on Amazon.
I also help solve your data engineering problems contact@waitingforcode.com 📩
Read also about Docker images and Apache Spark applications here:
- Best practices for writing Dockerfiles Use volumes 7 best practices for building containers Configuration Best Practices Improve your Dockerfile, best practices Best practices writing a Dockerfile From env variables to Docker secrets microk8s registry images How to access micro8ks's dashboard web UI? Cannot resolve pod ip address #188 [K8S] Intermittent "java.net.UnknownHostException: kubernetes.default.svc" in Spark driver Spark jobs failing on latest versions of Kubernetes (1.15.3, 1.14.6, 1,13.10, 1.12.10, 1.11.10) EKS security patches cause Apache Spark jobs to fail with permissions error
Related blog posts:
- YARN or Kubernetes for Apache Spark?
- Kubernetes concepts for Apache Spark
- Stage level scheduling
- What's new in Apache Spark 3.1 - Kubernetes Generally Available!
- Setting up Apache Spark on Kubernetes with microk8s
As announced last week ? today I published a blog post about #Docker images for #ApacheSpark https://t.co/oyHG7m3kYY
— Bartosz Konieczny (@waitingforcode) February 8, 2020