
In the last blog post of the data quality on Databricks series we're going to discover a Databricks Labs product, the DQX library.
What would it take for you to trust your Databricks pipelines in production?
A 3-day bug hunt on a 3-person team costs up to €7,200 in lost engineering time. This workshop teaches you to prevent that — unit tests, data tests, and integration tests for PySpark and Databricks Lakeflow, including Spark Declarative Pipelines.

Konieczny
DQX 101
Data Quality Framework, DQX in short, is a new project coming from Databricks Labs. The framework in a nutshell is:
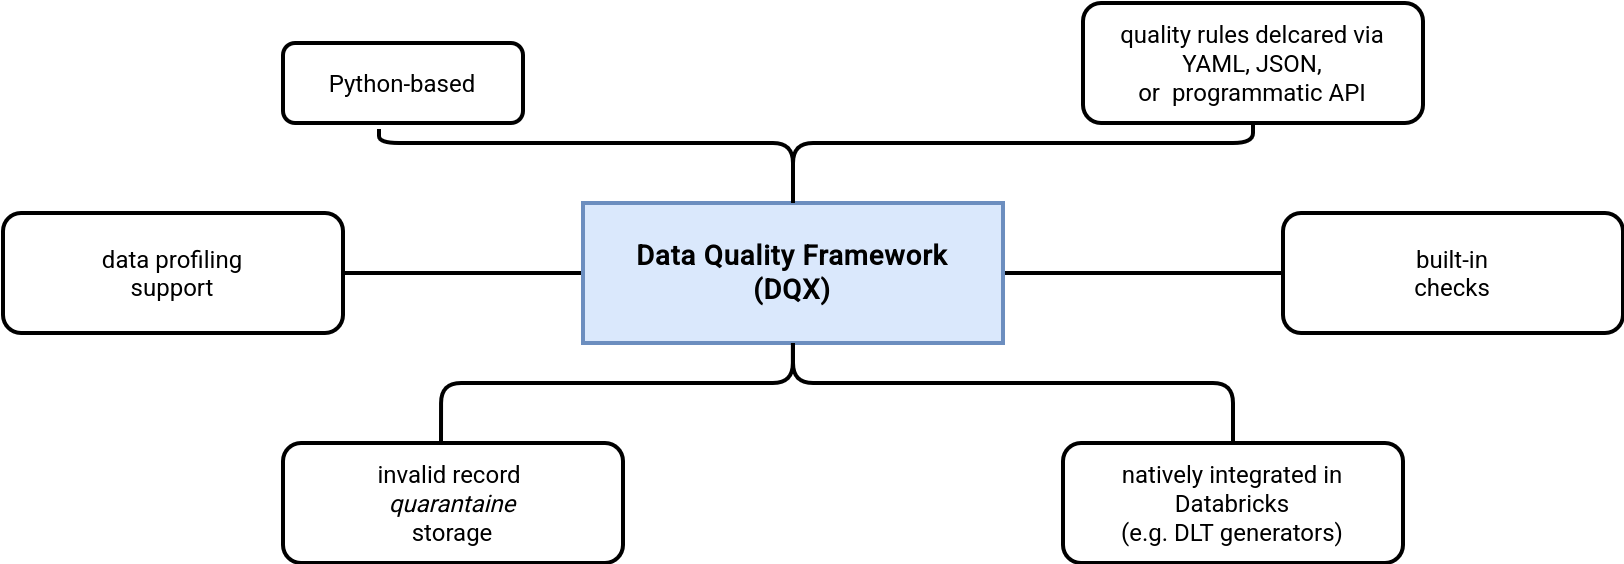
At first glance, it may look like yet another data quality framework. However, there are some nice features compared to other libraries:
- Data profiling support. With that feature you can ask DQX to analyze a (configurable) sample of your dataset and generate a set of data quality rules for you.
- Databricks integration. It's not surprising because the project comes from Databricks Labs but it's worth mentioning the data quality rules generated in DQX can be easily converted to the expectations in Delta Live Tables.
- Built-in checks. No need to code common data quality checks, such as nullability, range, or date; several of them are available as native row-level checks.
With all this context set, you should be now ready to delve into DQX and add the validations on top of user accounts data.
Configuring data quality checks
Let's begin the exploration with the quality checks declarations. You saw it probably in the schema above, DQX supports two methods:
- Declarative, where you define the data quality rules as part of JSON or YAML files.
- Programmatic, where you use the Python API.
In the blog post I'm going to focus on the programmatic part as it's shorter to represent but if you want to take a look, the documentation gives a lot of examples on using the files.
To define checks in the code, you need to declare them as DQColRule. The class accepts the following attributes:
@dataclass(frozen=True)
class DQColRule:
  check_func: Callable
  col_name: str | Column | None = None
  name: str = ""
  criticality: str = Criticality.ERROR.value
  filter: str | None = None
  check_func_args: list[Any] = field(default_factory=list)
  check_func_kwargs: dict[str, Any] = field(default_factory=dict)
In a more precise manner, you can configure a DQColRule with:
- check_func that defines the data validation function. You can either reference the built-in functions from the from databricks.labs.dqx import row_checks, or use your own validation functions.
- check_func_args and check_func_kwargs that contain a list of arguments to apply to your check_func. It can be useful for any range-based rules. TODO: add an info that the ufnction runs as UDF and you cannot query a DataFrame from inside!
- filter that defines the execution condition for the check_func. Put differently, your check_func will run only on the rows matching the filter condition. The condition can reference any column of the validated dataset, not only the one where you apply the check_func.
- col_name that stores the name of the column where the check_func will apply.
- criticality that defines the behavior of the data quality run in case of an invalid row. Can be one of: error (critical error) or warn (potential issue, possibly requiring some human judgment).
A nice feature of this quality rules declaration is the possibility to group the quality checks. For example, if you have multiple columns that can't be null, you can group them as part of a DQColSetRule with the column names passed as an array in the columns attribute:
DQColSetRule(columns=["id", "join_key"], criticality=Criticality.WARN.value, check_func=row_checks.is_not_null)
In addition to this columns grouping, you also have declaration flexibility. The validation function can be a Python function or a SQL expression. If you opt for the latter option, you need to configure the check_func with the sql_expression and pass your validation SQL expression in the check_func_kwargs, as here:
DQColRule(check_func=row_checks.sql_expression, criticality=Criticality.WARN.value,
          check_func_kwargs={'name': 'creation date is from the past', 'expression':
              'creation_date < NOW()', 'msg': 'Date is not from the past!'}),
Validation modes
At first, you might be thinking the criticality attribute will perform an action on your behalf, such as failing the data validation job. However, it's not the case because you're fully responsible for defining the data quality validation workflow with one of the available Python functions.
Three scenarios can happen here. The first scenario is when you want to split the validated dataset into valid and invalid datasets. DQX implements this feature with the apply_checks_and_split method:
valid_rows, invalid_rows = dq_engine.apply_checks_and_split(input_data, checks)
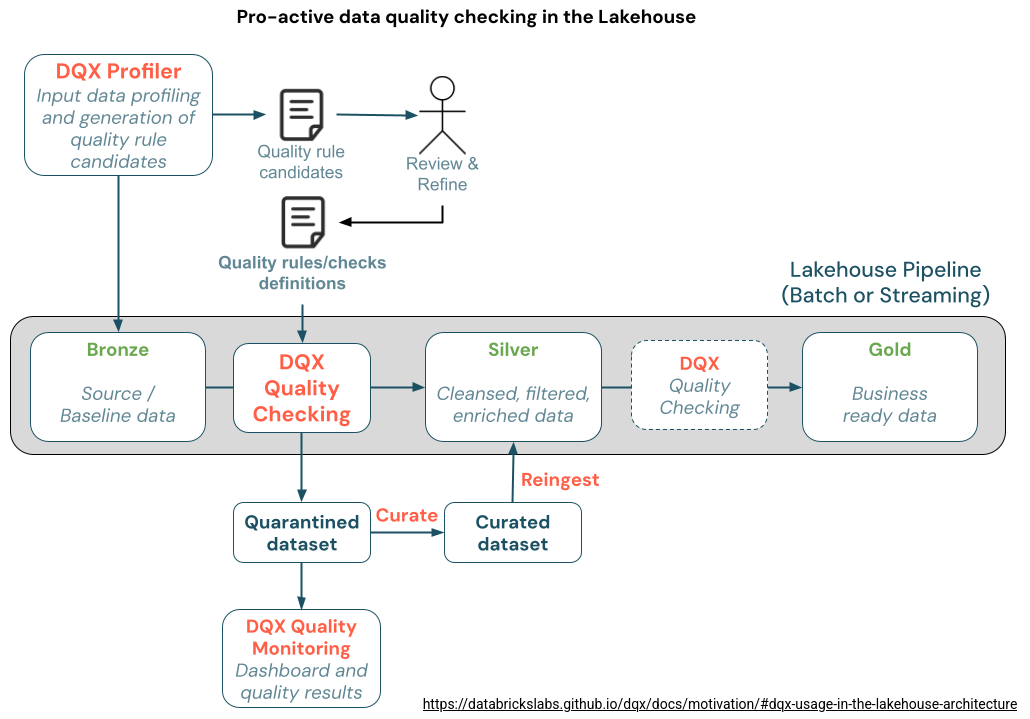
Dead-Letter design pattern
You should use the apply_checks_and_split to implement the Dead-Letter design pattern where invalid rows are written to a dedicated storage, with the possibility to integrate them to the main dataset after data quality fixes. The DQX documentation contains a nice visual explanation on how to implement the pattern in the context of a lakehouse:
The second scenario is when you want to annotate the invalid rows but keep them as part of the shared dataset with the valid rows. DQX performs this via apply_checks function. The validation outcome, depending on the configured criticality level, will be present in _warning or _error columns:
valid_and_invalid_rows = dq_engine.apply_checks(input_data, checks)
Finally, you may want to fail the data validation job in case of any issues. Here, you can look for errors in the apply_checks_and_split or apply_checks outcomes and fail the job if there is anything wrong. In "anything wrong" you can put anything you want, so for example a failure even at the first error, a failure from a particular threshold, etc.
Data profiling
So far so good but real life is rarely a bed of roses. Very often you'll struggle in the very beginning where you need to understand the dataset and to define the expected data quality rules. Thankfully, DQX has got you covered here with a data profiling feature. Under-the-hood, the feature samples your input dataset and runs DataFrame's summary() function:
# DQProfiler(DQEngineBase)
def profile(
    self, df: DataFrame, cols: list[str] | None = None, opts: dict[str, Any] | None = None
) -> tuple[dict[str, Any], list[DQProfile]]:
    cols = cols or df.columns
    df_cols = [f for f in df.schema.fields if f.name in cols]
    df = df.select(*[f.name for f in df_cols])

    df = self._sample(df, opts)
    dq_rules: list[DQProfile] = []
    total_count = df.count()
    summary_stats = self._get_df_summary_as_dict(df)
    # ...

def _get_df_summary_as_dict(self, df: DataFrame) -> dict[str, Any]:
    sm_dict: dict[str, dict] = {}
    field_types = {f.name: f.dataType for f in df.schema.fields}
    for row in df.summary().collect():
        row_dict = row.asDict()
        metric = row_dict["summary"]
        self._process_row(row_dict, metric, sm_dict, field_types)
    return sm_dict
To use the feature, you need to first initialize a new instance of DQProfiler and later pass the generated summary to the instance of DQGenerator:
workspace_client = WorkspaceClient()
profiler = DQProfiler(workspace_client)
summary_stats, profiles = profiler.profile(input_data)

rules_generator = DQGenerator(ws)
data_quality_rules = rules_generator.generate_dq_rules(profiles)
Once generated, you can save data_quality_rules in a file with:
dq_engine = DQEngine(workspace_client)
dq_engine.save_checks_in_workspace_file(data_quality_rules, workspace_path="/data_quality_rules_from_profiling.yml")
Example - simple rules
To see DQX in action, let's use the same example as in the previous blog post of the series. The example is a relatively small dataset representing user accounts. The dataset has some issues such as missing fields or skewed distribution.
Let's start by initializing the content of the account and account types tables. For the sake of simplicity, they're both built from an in-memory DataFrame and written as Delta Lake tables:
spark_session.createDataFrame(data=[
Row(id=1, name='type a'), Row(id=2, name='type b'), Row(id=3, name='type c')
]).write.format('delta').mode('overwrite').saveAsTable('account_types')

accounts_dataframe = spark_session.createDataFrame(data=[
Row(id=1, name='account 1', email='email1@email', account_type='type a',
    creation_date=datetime.datetime(2025, 1, 10, 14, 50), meta_dq_run_id=None, meta_dq_run_datetime=None),
Row(id=1, name='account 1', email='email1@email', account_type='type a',
    creation_date=datetime.datetime(2025, 1, 10, 14, 50), meta_dq_run_id=None, meta_dq_run_datetime=None),
Row(id=2, name='account 2', email='email2@email', account_type='type b',
    creation_date=datetime.datetime(2025, 1, 10, 11, 50), meta_dq_run_id=None, meta_dq_run_datetime=None),
Row(id=3, name='account 3', email='email3@email', account_type='type c',
    creation_date=datetime.datetime(2025, 1, 10, 8, 50), meta_dq_run_id=None, meta_dq_run_datetime=None),
Row(id=4, name='account 4', email='email4@email', account_type='type XXXX',
    creation_date=datetime.datetime(2025, 1, 9, 14, 50), meta_dq_run_id=None, meta_dq_run_datetime=None)
], schema='id INT, name STRING, email STRING, account_type STRING, creation_date TIMESTAMP, meta_dq_run_id STRING, meta_dq_run_datetime TIMESTAMP')
accounts_dataframe.write.mode('overwrite').format('delta').saveAsTable('accounts')
The next step is the definition of the data quality rules. Since the complex rules are not supported (yet), we're going to start with the column-based checks that verify correctness of the email, date, or id:
def check_email(column_name: str) -> Column:
  column = F.col(column_name)
  return make_condition(~ column.contains("@"), f"Column {column_name} doesn't contain the @", f"{column_name}_valid_email")


def get_simple_rules_for_account() -> List[DQColRule]:
  from databricks.labs.dqx import row_checks
  return [
    DQColRule(col_name='id', name='id is defined', check_func=row_checks.is_not_null, criticality=Criticality.ERROR.value),
    DQColRule(check_func=row_checks.sql_expression,
              criticality=Criticality.WARN.value,
              check_func_kwargs={'name': 'creation date is from the past', 'expression':
                  'creation_date < NOW()', 'msg': 'Date is not from the past!'}),
    DQColRule(col_name='email', name='correctly formatted email', check_func=check_email, criticality=Criticality.WARN.value)
]
You can see here three types of the data quality rules:
- Built-in with the DQColRule(col_name='id', name='id is defined', check_func=row_checks.is_not_null, criticality=Criticality.ERROR.value). The rule applies to the id column and verifies whether it's not null.
- SQL expressions with the DQColRule(check_func=row_checks.sql_expression, criticality=Criticality.WARN.value,check_func_kwargs={'name': 'creation date is from the past', 'expression': 'creation_date < NOW()', 'msg': 'Date is not from the past!'}). As you can see, it verifies whether the date is not in the future. Besides the SQL expression, there is a significant difference with the built-in checks. The declaration doesn't include the col_name attribute. It's on purpose. Otherwise, DQX fails with a duplicated expression defined:
Traceback (most recent call last): # ... DQColRule(check_func=row_checks.sql_expression,col_name='creation_date', File "
", line 10, in __init__ File "/home/bartosz/.venvs/pyspark-3.5.0-python3.10/lib/python3.10/site-packages/databricks/labs/dqx/rule.py", line 71, in __post_init__ check = self._check File "/home/bartosz/.pyenv/versions/3.10.15/lib/python3.10/functools.py", line 981, in __get__ val = self.func(instance) File "/home/bartosz/.venvs/pyspark-3.5.0-python3.10/lib/python3.10/site-packages/databricks/labs/dqx/rule.py", line 128, in _check return self.check_func(*args, **self.check_func_kwargs) TypeError: sql_expression() got multiple values for argument 'expression' - Custom data quality rule to verify the email correctness with DQColRule(col_name='email', name='correctly formatted email', check_func=check_email, criticality=Criticality.WARN.value).
With all these rules set, we can now apply them to the new accounts to insert:
workspace_client = WorkspaceClient()
dqx_engine = DQEngine(workspace_client)
valid_accounts, invalid_accounts = dqx_engine.apply_checks_and_split(account_to_write, validation_rules)
As you can see, it's relatively straightforward and the application function returns the invalid rows directly. However, that's where DQX stops. If you want to write the invalid_accounts to a dead-letter storage, you need to add a dedicated call to the write method, such as:
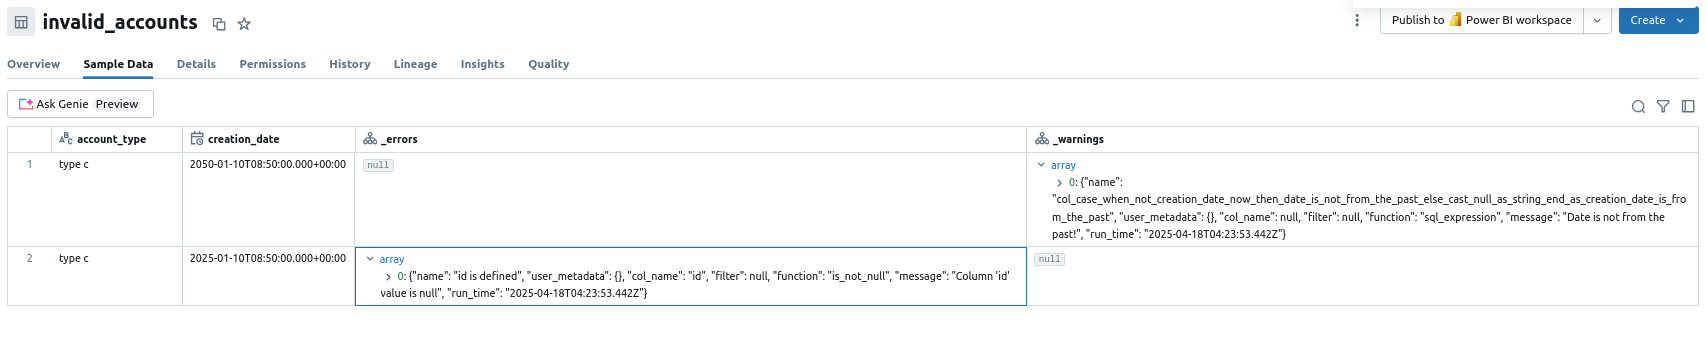
invalid_accounts.write.mode('overwrite').format('delta').saveAsTable('invalid_accounts')
Although it makes the code more verbose, it's not a big deal and gives you flexibility to do anything you want with the invalid rows. After running this code as a task of a Databricks job, you should see the erroneous rows in the dead-letter table with the error details in warning or error column, depending on the type of the configured rule:
By metadata methods
If you prefer running the YAML- or JSON-based data quality rules, you can use the by_metadata functions like apply_checks_by_metadata_and_split and apply_checks_by_metadata. The main difference with the no-metadata functions is the type of the data quality rules that makes the metadata functions more suitable for configuration-driven approach:
def apply_checks(self, df: DataFrame, checks: list[DQColRule])
def apply_checks_by_metadata(self, df: DataFrame, checks: list[dict], custom_check_functions: dict[str, Any] | None = None)

def apply_checks_and_split(self, df: DataFrame, checks: list[DQColRule])
def apply_checks_by_metadata_and_split(self, df: DataFrame, checks: list[dict], custom_check_functions: dict[str, Any] | None = None)
Example - complex rules
OK then, we have the input dataset splitted. But it's not the end. If you remember our previous test with Spark Expectations, in the test we also need to implement two more advanced rules, one for the integrity, and another for the seasonality. These complex validations are not natively available in DQX but since the API is quite flexible, you can implement them in various ways. If you want to stay with the DQX spirit, you can create a dedicated DataFrames, one for each validation type, and apply the DQColRule on them. For the integrity it might look like...:
rule_for_types = DQColRule(col_name='missing_types', name='all account types are defined', check_func=row_checks.sql_expression,
         criticality=Criticality.ERROR.value, check_func_kwargs={'expression': 'missing_types = 0',
            'msg': 'There should not be missing types'})
missing_types_dataset = spark_session.sql('''SELECT COUNT(*) AS missing_types FROM valid_accounts a
    LEFT ANTI JOIN account_types at ON at.name = a.account_type''')
_, invalid_types = dqx_engine.apply_checks_and_split(missing_types_dataset, [rule_for_types])
...and for the seasonality like:
rule_for_seasonality = DQColRule(col_name='rows_difference', name='seasonality check', check_func=row_checks.sql_expression,
          criticality=Criticality.ERROR.value, check_func_kwargs={'expression': 'rows_difference >= 0',
    'msg': 'There should be more than 0'})
seasonality_result = spark_session.sql('''SELECT
  SUM(rows_number_new) - SUM(rows_number_old) AS rows_difference
    FROM (
      SELECT COUNT(*) AS rows_number_new, 0 AS rows_number_old FROM accounts_staging
        UNION ALL
      SELECT 0 AS rows_number_new, COUNT(*) AS rows_number_old FROM accounts
)''')
_, invalid_seasonality = dqx_engine.apply_checks_and_split(seasonality_result, [rule_for_seasonality])
After running both checks, if any of the DataFrames with invalid rows is not empty, you can either send a warning message but write the valid accounts to the table, or fail the data ingestion step, as I'm doing in the next snippet:
if not invalid_seasonality.isEmpty() or not missing_types_dataset.isEmpty():
    raise RuntimeError('Detected some validation issues for seasonality or data integrity: '
                f'seasonality result: {invalid_seasonality.collect()}'
                f'types result: {missing_types_dataset.collect()}')
After running our validation job with these lines, you should see the error message:

Native API
You could also implement these complex rules with Apache Spark native API, such as:
missing_types_dataset = spark_session.sql('''SELECT COUNT(*) AS missing_types FROM valid_accounts a
	LEFT ANTI JOIN account_types at ON at.name = a.account_type''').collect()
if missing_types_dataset[0].missing_types > 0:
  raise Error('Reference integrity check failed')
Pros and cons
| Pros | Cons |
|---|---|
| Declaration flexibility is undoubtedly a nice aspect of DQX. You can define a single rule and assign multiple columns to it, use one of native data quality checks, or yet implement your own in Python or in SQL. | The lack of native support for complex data quality rules that you might use to validate seasonality or data integrity. Thankfully, the maintainers of the library are aware of that and have plans to extend the framework with these advanced validation rules in Q3 (see #74, #307). |
| Native integration with Databricks. After all, it's a project from Databricks Labs ;-) | Data profiling left me hungry. The DataFrame's summary method generates some high-level statistics and I was expecting to see other aspects, such as value distribution, distinctiveness, length, ... like in ydata-profiling. But do not get me wrong, having a data profiling as part of a data quality process is an amazing support for generating valuable data quality rules! |
| Flexibility. As you saw, everything is a code so you can do pretty much everything as long as you stay within Apache Spark boundaries.You're then not limited to writing to a particular type of data store, or to analyzing the DataFrame in a single way. | Implementation effort. On one hand the flexibility is great but on another hand, it also implies more implementation effort. An example of that could be writing invalid records to a dead-letter storage or sending an alert whenever the proportion of invalid records compared to the valid records would be too high. |
Before starting the data quality on Databricks series, I didn't expect to include the DQX to my analysis. Thankfully, by walking through the Databricks Labs Github repo, I found this project named with intriguing acronyms! As you can see, it uses a different approach than Delta Live Table expectations and Spark Expectations presented in the previous blog post, as it requires slightly more code. On the other hand, this code brings some additional flexibility and a smaller learning curve since the API is relatively easy to understand.
But I will disappoint you. I won't tell you what to use in your project; instead, I'll use this famous consultants' saying it depends ;) And if you want to discuss this more in details, drop me an email with your project at contact@waitingforcode.com
Data Engineering Design Patterns

Looking for a book that defines and solves most common data engineering problems? I wrote
one on that topic! You can read it online
on the O'Reilly platform,
or get a print copy on Amazon.
I also help solve your data engineering problems contact@waitingforcode.com 📩